
Do you struggle to generate maximum power with your Rear Cross in Muay Thai, even after training, and comparing yourself to experienced practitioners online or at your gym?
Not to worry–you’re not alone. The Rear Cross is one of Muay Thai’s fundamental punches. Its surprisingly complex and requires many parts of your body to work together as one.
After teaching hundreds of students and making every mistake possible, I’ve identified the exact issues that rob most fighters of their power – and more importantly, how to fix them.
In this guide, you’ll discover:
-
The 6 most common power-draining mistakes
-
Step-by-step fixes for each issue
-
Training drills that actually work
Quick Technique Overview of the Rear Cross for Thai Boxing:
The Rear Cross is a powerful punch thrown with the rear hand of your fighting stance. It is a devastating strike in Thai Boxing, capable of delivering fight-ending knockouts.
In Thai, a Straight Punch or Cross Punch is called Mat Trong (หมัดตรง).
Originally from Western boxing, this technique has become a fundamental weapon in Muay Thai, MMA, Kickboxing, and other combat sports.
Key Technical Points
Bruce Lee – “The less effort, the faster and more powerful you will be.”
To improve your Martial Arts skills, you must understand the concept of hitting efficiently rather than with raw power. People sometimes refer to this idea as Economy of Motion.
The idea of Economy of Motion is to strike along the shortest path to the target, this increases the speed of your strike and reduces the chances of you being countered by your opponent.
Every fighting technique you use should work with minimal wasted movement. Avoid excessive or flashy gestures that could slow down or telegraph your strikes.
Make the Rear Cross a fundamental part of your striking. It’s a powerful, straight punch with minimal telegraphing because of the rear hand’s position.
Six Power-Draining Mistakes
George Foreman – “Power isn’t just in the arms, it starts from the ground up.”
Problem #1: Arm Push Instead of Body Rotation.
One of the biggest mistakes in throwing a Rear Cross is only using your arm to punch. Real power comes from moving your whole body together. Think of your body as one piece – when you throw the punch, everything should turn together like a door swinging on its hinges.
Picture throwing a punch like cracking a whip. On a whip, the power starts at the handle, not the tip. In boxing, your feet are like the whip’s handle, and your fist is the tip. The power has to start from your feet and travel up through your body.
Tips to Help you Connect to the Ground & Use Kinetic Linking
Plant your back foot firmly on the ground, like you’re trying to squish a grape under it. Really try to feel that grape – you want to twist your foot as you squish it into the mat.
This twisting motion is extremely important – it gives you a strong base to turn your body and deliver a powerful punch. Every time you practice your Rear Cross, imagine that grape under your foot. The more you practice crushing it, the more natural the movement will feel.
The Science Behind It
This isn’t just an old boxing trick – scientists proved it works! A study in the Journal of Strength and Conditioning Research (Ebben & Jensen, 2010) further explains this concept through the kinetic chain – the proper sequencing of whole-body movements that amplify upper-body power.
Research from The Journal of Sports Sciences showed that punching power isn’t really about arm strength at all. They used special measuring tools called force plates to study what makes a punch powerful. They discovered the strongest punches start from the legs and stomach muscles, not the arms.
Think about how a baseball player hits a home run or how a runner pushes off their starting blocks to sprint – they use their whole body, starting from the ground. Throwing punches works the same way!
How Everything Works Together
Think of your body like a row of dominoes. When you knock over the first one, it starts a chain reaction – each domino hits the next one, making the last domino fall even faster than if you’d just pushed it by itself. Your Rear Cross works like this, generating power from the ground up for a strong punch.
It all starts with your back foot (remember the grape!). When you twist that foot, it’s like knocking over the first domino. That twist makes your legs turn, which makes your hips turn, which makes your shoulders turn, and finally – POW! – your fist delivers the punch.
Here’s another way to think about it: Picture using a whip to knock a can off a fence. You don’t just move the tip of the whip – you start by moving the handle. With punching, your feet are like the whip’s handle, and your fist is like the tip. When you move the handle (your feet), the power travels up to the tip (your fist), making it crack!
This is why even smaller skilled fighters can hit super hard. They’re not just using their arms – they’re using their whole body like a power chain, starting from the ground up. It’s like turning your whole body into one big spring that uncoils with the punch.
Problem #2: Incorrect Weight Distribution
Weight distribution is essential for generating power in your strikes. Many Muay Thai practitioners tend to lean forward unconsciously when they are first learning to throw the Rear Cross, which can hinder their power.
This will compromise their balance and reduce the power of their punch.
Keeping 60% of your weight on your front leg and 40% on your back foot allows for better balance, stability, and power transfer. This positioning helps you generate force efficiently,
Tips to make sure you have a good balance:
When doing the Rear Cross, keep in mind, that you want your “Nose behind Toes”.
Avoid leaning forward so that your nose passes over your toes, like in a Japanese bow. Dropping your head too low throws you off balance, weakens your punches, and makes you an easier target for counterstrikes.

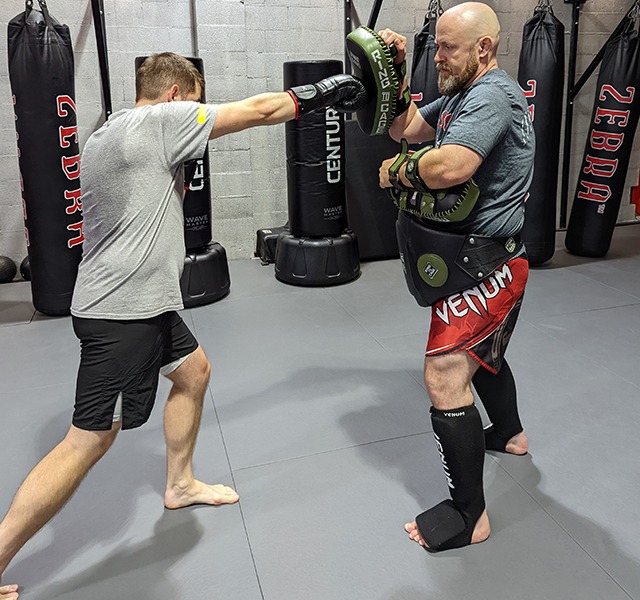
Right cross fundamentals: Full extension combined with proper body mechanics demonstrates effective power transfer from ground up.
Problem #3 – Lack of Shoulder Engagement
The rear shoulder is essential for extending the punch and adding power. If the shoulder is not fully engaged during the punch, the Rear Cross will lack strength and effectiveness.
Tips to help drive your shoulders into your punch:
Make sure the rear shoulder rolls forward during the punch. This not only extends the range but also adds momentum and torque to your Rear Cross.
Problem #4 – Improper Alignment of the Punching Arm.
The alignment of the fist, wrist, and forearm is critical. Misalignment reduces power transfer and increases the risk of injury.
Tip to have Your Punch Aligned Properly:
When delivering the Rear Cross, the fist should land with the knuckles facing forward and the wrist straight.
The key to most punches is to keep the elbow positioned behind the wrist. To maintain a straight wrist, visualize it as if it doesn’t exist and think of your wrist and forearm as one solid unit.
Power generation in action: Proper weight transfer and body rotation creates a devastating right cross punch.
Problem #5- Telegraphing
Imagine you’re playing catch, and before you throw the ball, you pull your arm way back. Everyone knows exactly when you’re going to throw, right?
In Combat Sports this is called “telegraphing” – showing your move before you make it. This is a huge mistake!
Many beginners make this error with their Rear Cross. They pull their arm back first, like they’re about to throw a baseball. This creates two big problems:
- It’s like warning your opponent “Watch out, here comes my punch!”
- It turns your quick, sharp punch into a slow, pushing motion
Tips to prevent Telegraphing:
Imagine you’re standing next to a brick wall. When you throw your Rear Cross, your elbow should never touch that imaginary wall beside you. If it does, you’re pulling back too far!
Think of your punch like a rubber band snap – quick and direct. You don’t need to stretch it back very far to get power. Your punch should be the same way. Keep your arm relaxed and close to your body until the exact moment you strike.
Remember: The power of your punch doesn’t come from pulling back your arm – it comes from twisting your body and pushing off the ground (remember that grape we were squishing?). A good Rear Cross should be sharp and snappy, like a whip crack, not pushed like you’re shoving a heavy box.
When you practice, try throwing your punch while actually standing next to a wall. If your elbow hits the wall, you know you need to adjust. Soon, you’ll be throwing quick, powerful punches that your opponent won’t see coming!
Problem #6: “Posing for the Picture”
A common mistake many Muay Thai students make is leaving their arm hanging out after throwing a Rear Cross. They hit the heavy bag and freeze with their arm extended – like they’re posing for a martial arts magazine cover. This might look cool in photos, but in real fighting, it’s asking for trouble.
When your arm is stuck out there, you’re giving your opponent a perfect chance to hit you back. It’s like putting up a big sign that says “Free Shot – Hit Me!” You’re completely open and unprotected, which is the last thing you want in a fight.
Tips to Prevent “Posing for the Picture”
Think of your punch like catching a hot potato. You wouldn’t want to hold onto it, right? As soon as your punch lands, snap your hand right back to protect your face. Your hand should come back just as fast as it went out.
Remember this simple rule: Punch → Pull Back → Protect. Do these three things so quickly they feel like one movement.
Practice this on the heavy bag:
- Throw your Rear Cross
- Pull your hand back instantly
- Get it back to your face to protect yourself
The faster you bring your hand back, the safer you’ll be and the quicker you can throw another punch. Plus, bringing your hand back quickly actually helps make your punch snappier!
📋 Power Check: Rate Your Rear Cross
Test your technique with this quick self-assessment. Score yourself on these critical elements of a powerful Rear Cross:
□ Ground Connection
- Does your rear foot “screw” into the ground?
- Can you feel the mat grip under your foot?
□ Hip Rotation
- Do your hips explosively rotate with the punch?
- Is your power coming from your core, not just your arm?
□ Shoulder Mechanics
- Does your rear shoulder drive forward naturally?
- Is your punching shoulder protecting your chin?
□ Clean Delivery
- Is your punch direct, with no telegraphing?
- Does your elbow stay tight to your body?
□ Sharp Recovery
- Does your hand snap back to your guard position?
- Are you ready to throw another strike immediately after
Building Power Beyond the Basics
Teddy Atlas – “Punching hard isn’t about muscle; it’s about technique, timing, and torque.”
Now that you understand the common mistakes that drain power from your Rear Cross, let’s explore how to supercharge your technique with supplemental training. Fixing these technical issues is crucial, but adding the right training methods will help to cement proper form and build explosive power.
Think of it this way: fixing your technical mistakes is like tuning up a car’s engine, but supplemental training is like adding a turbocharger. Both are important for maximum performance.
Here’s why supplemental training matters:
-
It reinforces proper mechanics
-
Builds the specific muscles needed for power
-
Develops explosive movement patterns
-
Improves overall striking coordination
Top 3 Supplemental Methods to Generate More Power in your Rear Cross:
The methods we’ll cover next are tried and tested methods I’ve used with hundreds of students.
-
Breathing techniques for power amplification
-
Medicine ball work for explosive rotation
-
Resistance band training for speed, snap, and endurance
Remember: These aren’t just random exercises – they’re specifically chosen to complement your technical training. Think of them as building blocks that stack on top of your foundation.
Ready to take your Rear Cross to the next level?
Let’s break down each supplemental exercise and how it will help you develop knockout power.
1. Exhale When Striking: Amplify Power, Reduce Fatigue
The Role of Breathing in Your Strikes
Have you ever noticed the variety of sounds fighters make when they strike? From subtle hisses to powerful yells, each noise is quite significant.
What is the real connection between breathing and effective striking?
Research in combat sports shows that coordinated breathing is vital for improving your technique. Consider it like a pressure valve: exhaling at the right moment helps your body move more efficiently and with greater power.
When executing a Rear Cross, timing your exhale with the punch serves several important functions:
-
Engages Your Core: A proper exhale tightens your core, providing stability during powerful strikes.
-
Prevents Breath-Holding: By exhaling, you avoid the common mistake of holding your breath, which can lead to fatigue.
-
Maintains Rhythm: Coordinating your breath with your movement helps maintain rhythm and flow.
-
Creates Natural Tension: This tension aids in generating more power behind your strikes.
There are various ways to breathe during your punches, and finding what works best for you is key:
– A sharp “tss” sound through your teeth
– A focused exhale through your nose
– A strong “kiai” yell (but be cautious—an open mouth can leave you vulnerable to jaw-breaking strikes)
Ultimately, the goal is to find a breathing technique that feels natural while ensuring you maintain proper form.
Pro Tip: Begin practicing your breathing during shadowboxing. Once the breath feels natural, transition it into your bag work and pad drills for a seamless integration into your striking routine.
Mastering proper breathing techniques can greatly enhance your striking power and decrease fatigue. When you exhale sharply through your nose or mouth at the moment of impact, you not only stabilize your core but also direct your energy into the strike.
Regardless of the breathing technique you use, exhale the air from your body as you execute your Rear Cross.
2. Medicine Ball Drills:
Your regular training—hitting Thai pads, focus mitts, the heavy bag, and practicing partner drills, all help develop explosive power in your punches.
An additional method is to do Medicine Ball Throws.
Below is an excellent video from Boxing Science YouTube Channel demonstrating why and how to use medicine ball drills to increase power in your Rear Cross.
5 Medicine Ball Punch Exercises to Increase Knockout Power
These drills will improve hand speed, kinetic chain sequencing, and rotational power—key components of a devastating punch.
1. Medicine Ball Punch Throw
This drill simulates a rear-hand punch starting from the chin in a boxing stance. The focus is on generating force from the lower body and transferring it through the kinetic chain for maximum power. Proper hip rotation is essential—avoiding shallow movements or excessive leaning over the front foot ensures the best power transfer.
2. Medicine Ball Body Shot Punch Throw (Body Cross)
Designed to mimic a rear-hand body shot, this exercise engages the lower body and enhances power transfer. A straight-down punch into a rotation, builds strength and coordination, letting fighters use power from their feet up.
3. Step Back Medicine Ball Punch Throw
This drill is perfect for counter-punching. The fighter drops back onto the rear foot, then explosively drives forward into a punch. Ideal for “springy” fighters, this movement builds reactive power and improves the ability to strike off defensive movements.
4. Lateral Medicine Ball Punch Throw into Lead Hook
This exercise helps strengthen forward movement faster by improving hand speed, balance, and core strength. After taking two steps forward, the fighter rotates into a powerful medicine ball throw, followed by a lead hook in the air, reinforcing proper positioning and force control.
5. Medicine Ball Baseball Pitch Throw (Deontay Wilder Style)
This variation emphasizes maximum power, mimicking the full-body commitment of a knockout punch. By pushing off the rear leg and driving all the body’s force into the throw, this drill overloads hand speed and power, making traditional punches feel even sharper and more explosive.
3. Shadowboxing with Resistance Bands
Resistance bands add tension, forcing the body to engage additional muscles during the strike.
How to Practice with Boxing Resistance Bands:
Get access to Boxing Resistance Bands and practice your punches for 3 Rounds.
When it comes to resistance training for punches, I prefer using boxing resistance bands rather than small dumbbells. The bands provide variable resistance throughout the movement and allow for more natural punch mechanics. The bands also feel lighter on my joints.
Here’s a personal story I have about resistance training safety:
I learned this lesson the hard way back in my 20s. Eager to build more punching power, I tried what seemed like a brilliant idea at the time – shadowboxing with small weights inside my boxing gloves. I figured more weight equals more power and endurance, right?
Wrong!
After just a few training sessions, I began feeling sharp pain in my elbows and shoulders. Within two weeks, my joints were in agony—even simple tasks like reaching for a coffee cup became uncomfortable. That’s when I realized my “brilliant” training idea wasn’t so brilliant after all.
After taking a frustrating two weeks off to let my joints recover, I switched to resistance bands for my shadowboxing. The difference was immediate – I could feel my muscles working without the jarring impact on my joints. I’ve been using bands ever since, and those joint issues never came back.
This experience taught me something important: sometimes the most obvious solution (adding weight) isn’t the smartest one. While I can’t say this will be everyone’s experience, I know my joints are much happier with resistance bands than they ever were with weighted gloves.
Final Thoughts
Remember, power isn’t just about hitting harder–it’s about hitting smarter. A secure, technical Rear Cross will not only be more powerful but also faster and less taxing on your body. Take the time to break down the movement, practice consistently, and most importantly, be patient with your progress.
Focus on one element at a time rather than trying to fix everything at once. Start with your footwork, then move up to hip rotation, and finally coordinate everything together.
The journey to developing a powerful Rear Cross is ongoing, but with consistent practice and attention to these details, you’ll see significant improvements in your striking power.
